Ceramic Bead Artists Tutorial by Marsha Hedrick -- Mold Making for Slip Casting
Slip Casting Beads
Recycled Brighton Tin Cuff Bracelet and
Making Ceramic Beads
Painting Mimbres
Making a Lentil Bead
New Bracelet
Painting Lips, Cheeks and Eyes on Kids
Clay Play for Everyone
Making Ceramic Beads from 2-Part Molds
Making a Hollow Clay Focal Bead
Making Clay Tassel Beads
Glazing a daisy lentil bead
Houseold Items...Cool Looking Beads
Rolling Ceramic Beads
ABOUT FACE Necklace
Patching the pour hole in a poured bead
Pouring A Plaster Mold
Antique Lace Impressions in Clay
Making of a Bead Box
Making a Bead Measurer
Assembling a Hand formed Pendant
Pate' sur Pate' or slip trailing
Mold Making for Slip Casting
Stamping Ceramic Beads
Making Ceramic Beads
Mold Making for Slip Casting
By Marsha Hedrick
Share this Item with your Social Network friends.
(you need to be logged in to the social media) Tweet
(you need to be logged in to the social media) Tweet
SKILLS TAUGHT IN THIS TUTORIAL: Learn how to make a 2 piece plaster mold suitable for slip casting with ceramic, porcelain, or stoneware slips.

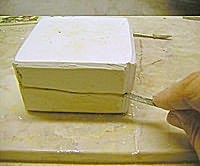
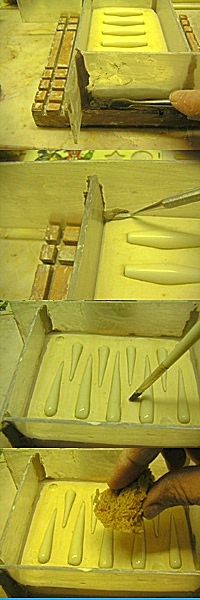
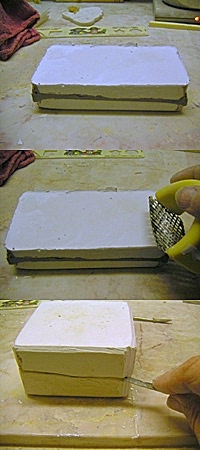
Next is the final smoothing and filling to get the clay perfect up to the parting line and to make it come up to the edge of the pieces in a smooth line with no little gaps and no extra clay sticking to the piece.
Do do this take a flat brush that has soft but reasonably stiff bristles and wet it. Squeeze off excess water between your fingers so that you don't leave a puddle of water on the clay. Then use the brush to clean the edge of the model and refine the line where the clay meets the model. You can see me doing this in the bottom photo.
During this process you will find small areas that need a tiny bit more clay or where a bit should be removed. After adding tiny amounts you can smooth it out with the brush. Continue in this manner until the surface of the clay is smooth and the line where the clay meets the model is even and crisp.
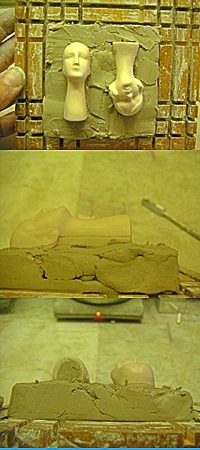
The second photo from the top shows the sealing of the edge of the clay on the inside of the mold against the acrylic. The third photo shows the sealing of the inside corners.
The bottom photo shows a mold sealed and ready to go. Be sure that you carefully seal all of the edges in this step or when you pour the plaster over the mold it is likely to leak out. When it does it usually fills in the grooves on your mold board. This is difficult to clean out and makes a big mess.
In the third photo you see the release agent being applied to all surfaces of the mold and the surrounding boards with a brush. I use a mixture of 1/2 murphy's oil soap and water. This is a cheap and very effective release agent. You can purchase special soap for mold making at ceramic stores but it is more expensive and doesn't work any better.
After the release agent has been applied you should take a damp sponge and sponge it off gently. Sponge off all of the surfaces that the release was applied to. Excess soap left on the surface of the clay or next to the model will cause the plaster to not set properly and will ruin the mold.
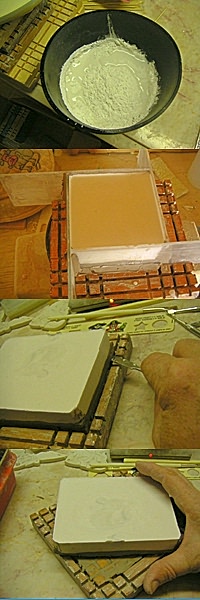
In the previous step the mold was measured and the cups of water required for the plaster was determined. My apologies to those of you that use cm instead of inches my only suggestion is to measure in cm then convert to inches. 250ml is approximately one cup and if you consistantly use the formula in the same way the results should be satisfactory. For each cup of water that you came up with in the previous step you need to weigh out 11 ounces (298 grams) of plaster. You can use a simple kitchen scale or postage scale for this purpose. If you have less than one cup divide accordingly. (ie: 1/2 cup water 5.5 ounces of plaster)
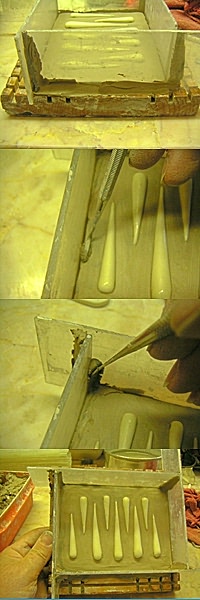
Measure the water into a mixing bowl. I have a rubber investment bowl that I use and it is very convienient. Dump the plaster all at once into the water and let it sit or slake for a couple of minutes. You can see this in the first photo. If you don't have a scale you can approximate by dumping plaster into the water until it makes a little mountain out of the top of the water. For a cup of water the mountain should be no more than an inch or two. This method will work but will result in molds that absorb differently on each side and may create some problems. The main reason for weighing and measuring is to achieve consistency which results in better casting and molds that will wear better as well. A cheap kitchen or postal scale is sufficient for this purpose.
After the plaster has slaked for a couple of minutes (All the plaster has gotten wet) stir it well with a dowel or chopstick or other round stick. A round stick will help to reduce bubbles that are introduced into the plaster. The corners on flat or square sticks create a current around the edges of them that introduce bubbles into the mix. Slaking the plaster prior to stirring also helps to reduce bubbles. Once you have stirred it well tap the sides of the bowl and/or pick up the bowl and drop it from maybe 1/2 inch off the table. Just high enough to jar it you don't want it to cause the plaster to jump out of the bowl. Alternately you can vibrate the bowl on a vibrator for a few seconds. These actions bring bubble to the top.
Now carefully pour the plaster into the lowest point on the mold allowing the plaster to rise up over the model. This method of pouring the plaster will tend to pull bubbles to the top and off the model as well. Once the mold has been poured gently lift a corner at a time maybe 1/4 in and let it drop. Again this helps dislodge bubbles. Or if you have a vibrator available you can again vibrate it for a few seconds. The second photo shows the mold after it has been poured.
Plaster is a chemical reaction and it produces heat. As the plaster begins to set it will heat up. When the heat is completely gone from the mold you can remove the boards and take the mold off. The third photo shows me using the flat tool and running it between the clay and the mold board to loosen the clay from the board. You want to be careful so that you do not damage the fresh plaster. After you have loosened the clay you should be able to twist it off the board by twisting it. See the bottom photo.
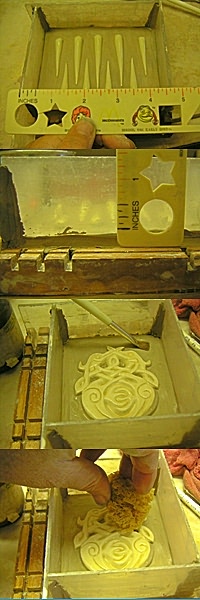
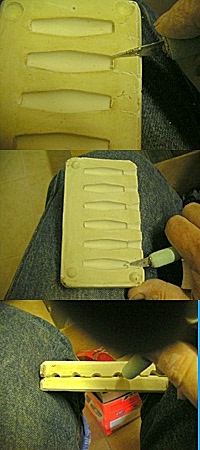
In the first photo you can see me using an x-acto wood carving tool with a round end to cut the keys into the mold. You can also use the end of a spoon or the handle or a melon baller to do this. What you want is a smooth rounded hole that has no undercuts.
After cutting the keys I use a shaper to cut of the square corner on the edge of the mold. This eliminates the sharp edge and also makes it easier to seal the mold to the boards for the second half.
Next brush the mold release agent (murphy's oil soap) onto the plaster. At least two or three coats will be required. Let each soak in and dry before applying the next. Be careful not to let it run down into the mold cavity. Although this will not ruin the mold it will cause the first few castings to absorb unevenly and stick to the mold. The soap will come out after a few pours, however, so it is not a total disaster. Even if you are careful you will usually end up with a tiny bit right next to the seam line and the first few castings in a new mold are likely to stick in the first half of the mold.
In the top photo you can see how the acrylic boards are sealed on the outside both across the bottom edge and up the corners just as they were for the first half.
In the second photo you can see how the inside is sealed by pressing clay down into the little V shape groove between the mold and the acrylic that is created by filing off the corner of the mold previously. Be sure to pack the clay tightly into this crevice or the plaster will leak out. Pack it down and smooth it out to a nice smooth top surface. Also seal the corners the same as before.
Next apply the mold release to the mold and the side boards with a brush.Again sponge off the mold release just prior to pouring the plaster.
If your models are reasonably even front and back and you are pouring plaster into the same mold(s) as you did in for the first half there is no need to measure the molds again just use the same amount of plaster and water as you figured before. And again pour it in the same way.
The top photo shows the mold after the boards have been removed.
Next take the shaper tool again and file off the sharp edges of the mold. This makes it look nicer, its easier on the hands to handle it and it is easier on the rubber bands. You can see this process in the middle photo.
In the bottom photo you see me using a flat knife like tool (a butter knife works but don't use a sharp knife) to open the mold. Carefully push the tool into the V shape groove and gently twist it slightly. Do this again on the opposite corner. You may need to do it a few times and possibly on each corner before it will 'pop' loose. Be sure to hold the mold in your hand holding both pieces together when you do this so you don't accidently launch part of the mold. In the picture you see the mold on a table because I had to hold the camera. The photo only shows the angle and location to put the tool, it is easiest to hold the mold in your hand (left if you are right handed) and use the knife with your other hand.
Once it has 'popped' loose put it on the table and carefully lift the top piece straight up off the bottom. Don't try to open it like a hinged box as this may result in chipping away bits at the edges of the cavities. If necessary you can hold it with one piece in each hand and gently rock it back an forth slightly to get it to slowly come off the model.
When you have it open carefully remove the model pieces and clean up the mold. Use the shaper to file the inside edge of the second half of the mold just as you did on the first half.
In the top photo you can see me marking the angle of the intended pour hole on one side of the mold. I use a sharp #11 X-acto knife to do this. Just score the shape of the pour hole at a nice angle.
Next use the x-acto knife over a trash can to carve out a half cone shape. (Middle photo) Pay attention to the tip of the knife while you are doing this so you don't cut into the cavity of the mold or poke it with the tip of the knife. Also be careful not to cut too close to the edge of the cavity. You should leave at least 1/16 of an inch that is flat on the end of straight pieces like vases or tube beads. Otherwise when you pour them removing the spare may cause some cracking down the side. This does not apply to round things like ball shaped beads.
When you have all the pour holes carved into one side of the mold put the mold together and use the cut side as a guide to mark the uncut side. You can see this process in the bottom photo. (Again you should hold the mold with your opposite hand not as shown in the photo I had to use mine to hold the camera) I carefully stick the point of the x-acto knife into the hole and score the plaster on the uncut side by drawing it out along the edge of the cut side. Again be careful not to poke the end in too far and poke the actual cavity of the mold. Now take the mold apart and carve out the second side of the pour holes.
Put the mold back together after the second half has been cut. Now carefully take the x-acto knife and finish off the pour holes so they line up nicely on both sides and are nice and round. When you have finished open the mold and blow out any debris that has dropped into the mold. Then put it back together and put rubber bands on it to hold it tightly closed. Use a stylus to write on an edge of the mold what it is for. (After the first dozen or so it is helpful to know what a mold is for without having to open it.) Molds should always be stored with the parting lines horizontal and on un-sealed wooden shelves. This is recommended for several reasons. 1. rubber bands sometimes break and if you have the mold stored with the parting line vertical it may fall open and break. 2. Although not usually a big deal with small molds, storing a mold with the parting line vertically can lead to the mold warping and the parting line not fitting together as tightly as it did. 3. Un-sealed wooden shelves are recommended as they allow the mold to breathe and dry out between uses. A metal shelf may rust and that may transfer to the mold plus it will not allow the mold to breathe as well.
I hope you have all found this informative and useful.