Ceramic Bead Artists Tutorial by Sharleen Newland -- Rolling Ceramic Beads
Slip Casting Beads
Recycled Brighton Tin Cuff Bracelet and
Making Ceramic Beads
Painting Mimbres
Making a Lentil Bead
New Bracelet
Painting Lips, Cheeks and Eyes on Kids
Clay Play for Everyone
Making Ceramic Beads from 2-Part Molds
Making a Hollow Clay Focal Bead
Making Clay Tassel Beads
Glazing a daisy lentil bead
Houseold Items...Cool Looking Beads
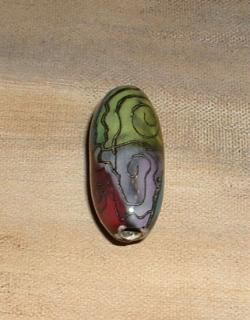
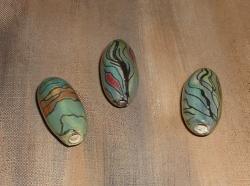
Rolling Ceramic Beads
ABOUT FACE Necklace
Patching the pour hole in a poured bead
Pouring A Plaster Mold
Antique Lace Impressions in Clay
Making of a Bead Box
Making a Bead Measurer
Assembling a Hand formed Pendant
Pate' sur Pate' or slip trailing
Mold Making for Slip Casting
Stamping Ceramic Beads
Making Ceramic Beads
Recycled Brighton Tin Cuff Bracelet and
Making Ceramic Beads
Painting Mimbres
Making a Lentil Bead
New Bracelet
Painting Lips, Cheeks and Eyes on Kids
Clay Play for Everyone
Making Ceramic Beads from 2-Part Molds
Making a Hollow Clay Focal Bead
Making Clay Tassel Beads
Glazing a daisy lentil bead
Houseold Items...Cool Looking Beads
Rolling Ceramic Beads
ABOUT FACE Necklace
Patching the pour hole in a poured bead
Pouring A Plaster Mold
Antique Lace Impressions in Clay
Making of a Bead Box
Making a Bead Measurer
Assembling a Hand formed Pendant
Pate' sur Pate' or slip trailing
Mold Making for Slip Casting
Stamping Ceramic Beads
Making Ceramic Beads
Rolling Ceramic Beads
By Sharleen Newland
Share this Item with your Social Network friends.
(you need to be logged in to the social media) Tweet
(you need to be logged in to the social media) Tweet
We will be using white earthenware clay to roll our beads today. This is a low fire clay, which means it fires to cone 04, about 1945 degrees F. I will take the beads home to fire for you. Once the clay has dried, it is known as greenware. The beads must be completely dry before they are fired, or they could explode in the kiln. When I am in a hurry to fire, sometimes I pre-fire the beads in my oven or small toaster oven to get them completely dry. After a cone 04 firing, the clay is called "bisque". It takes my kiln about 7 1/2 hours to fire the clay to cone 04 bisque.
Please be aware that greenware is extremely fragile. Handle with care! Designs cut from thin slabs of clay for pendants have a tendancy to warp while drying. The best way to avoid this is to dry them between two pieces of plasterboard. I bought two large pieces at Lowe's. You will not be able to dry 3D pendants with this method. I have found that 3D pieces have less tendancy to warp than flat, so I just take my chances. Loosely covering the pieces with plastic wrap will slow the drying time and help minimize warping.
One stage of drying clay is known as "leatherhard". This is when the clay is firm, but still damp. Leatherhard stage is a good time to add 3D pieces, as the clay is firmer and will hold it's shape when light pressure is applied. It is also a good time to carve designs into the clay.
Once the pieces are dry, they can be sanded or smoothed with water to give them a more finished look. If you are sanding your greenware beads or pendants, please use a dusk mask, as it is bad for your lungs to breathe in clay dust. A small wet paintbrush is a good tool for cleaning bead holes before firing. A pointed triangular clay knife inserted into the hole and twirled works well too, or a small role diamond file or bead reamer.
Will we be using bead rollers designed for polymer clay to shape some of our beads. You can buy these at JoAnn's or on the internet. I will also show you how to make some flat textured beads. Beads can also be formed by pressing them into a mold. Lampwork molds work well for this purpose. I oil my molds with cooking spray before pressing in the clay to ease the release of the clay from the mold.
You will need to make holes in your beads so that they are functional and can be strung. The size of the hole must match the size of the rod that the beads will be fired on after glazing. Greenware beads do not need to be hung for firing. I will pile them into clay flowerpots and fire them in the pot. The dried clay beads will not stick to each other. However, after glazing the beads must be hung and fired without touching one another. There are different sizes of rods available for firing. If you want very small holes in your beads, I have found that high temp wire works as a rod. It will sag, but I have never had one collapse. Do not hang anything heavy on the smaller gauge wire. Pendants and heavy beads will drag it down and cause it to collapse during firing.
To make the holes, I use knitting needles or bamboo skewers. To make the hole, choose a spot to begin piercing and push the tool through until it just starts to protrude from the other side. Withdraw the tool, and insert it again at the opposite side at the point where it started to poke through. It will take a little practice to make a centered hole straight through the bead. There is also a tool available that digs out some of the clay while making the hole. I will show you these in class. I purchased mine at Chinese Clay Art on the internet.
Clay shrinks during drying and again during firing. It will be necessary to experiment with the piercing tools to make sure the hole is the correct size for threading on the rods after the clay has been fired to bisque. You will need to choose which size rod you want to use for your beads before piercing the holes. It is possible to drill out the holes after firing if they are too small. A Dremel type tool works for this purpose. Please be careful. Hold tight to the bead or put it in a clamp. Please be aware that drilling also creates heat. The holes can also be reamed out by hand using a bead reamer or small round diamond file. Drilling is time consuming and difficult, so it is much better to make nice clean holes in the wet clay before firing.
Next week I will bring back your fired beads and pendants and we will begin the fun of adding color and design with glaze.